I had been looking around
for some time to install a suitable battery monitor to let me
know the 'state of charge' of the deep cycle battery in our Cub
Camper Trailer, more than the information a voltmeter gives. It
was not an easy process as there were a few problems to work
around.....
* Most battery monitors
are not water proof or UV stable
* Something decent was always going to cost some dollars
* I needed a unit that wasn't bulky
* It had to be seen when the camper was packed & stored in the
garage
* I didn't like the idea of cutting into the original panels
* How to fit cheaply & easy without major changes
I needed a quality monitor
that would last the test of time. Some of the cheaper units had
bad reviews or no information about them, like some that were
advertised on Ebay. The NASA battery monitor range had a good
name & was recommended to me by members of the CamperTrailers
Group who use them. They are built for a marine environment so
no doubt would perform well in the dusty & road vibration
conditions subjected to the camper trailer.
I ended up purchasing a
NASA BM1 Compact battery monitor for $225 delivered with one
year warranty & measures only 124mm x 62mm x 23mm with a screen
size of 50mm x 60mm. Along with the monitor comes a five metre
length of cable prefitted with terminals, a fuse & a 100amp
shunt.
Now where to mount the
monitor. After careful consideration I found the perfect
location to be on the side of the pantry draw. Here I could
slide the draw out whether camping or at home for a quick look
as to the battery state of charge.
parts
required
* two metres of 16mm steel
core, PVC coated conduit & end fittings
* Aluminium angle for end fitting mounts
* Cable ties
* Cable tie mounts
* Heat shrink of different diameters
* Pop rivets
* Two screws for mounting bracket
tools
* cordless drill, 4.8mm cobalt tipped drill bit & a phillips
head driver bit
* Steel cutting compound - used when drilling stainless steel,
stops the heat build up
* Pop riveter
* Shifter & 10mm spanner
* Small phillips head screw driver
* Crimping tool
* Heat gun
* Scissors
in position
 |
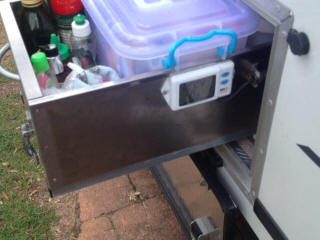
This photo shows
the pantry fully opened with the NASA BM1 Compact
battery monitor mounted to the rear side giving it more
protection.
In this position
there is around three metres of cable length from the
monitor to the battery.
I made up some end fitting brackets from aluminium angle
& pop riveted into place using cable tie brackets to
mount the conduit.
|
|
This photo shows the pantry open at 300mm making the
monitor easy to at any time especially when sitting down
under the awning when camping. |
 |
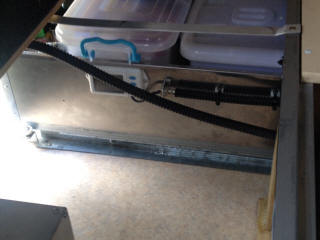 |
Photo taken from
inside the camper showing the pantry in its closed
position & before I put the two cable ties in place
where the cable goes right at the top of the conduit
loop. |
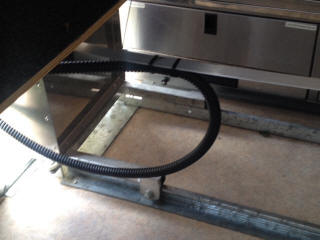
| Showing the pantry open about ninety percent. The
conduit just loops back & stores next to the pantry when
packed away. Only need to keep about 100mm clear space
next to the pantry. |
 |
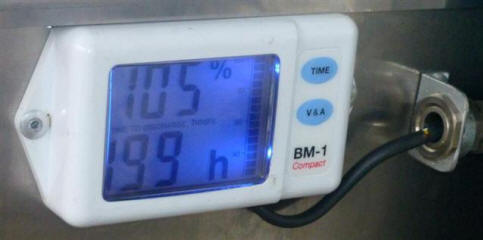
how it works
The NASA BM1 Compact battery monitor continuously monitors
voltage, current (charge or discharge), number of amp/hours
(charge or discharge), the batteries state of charge and the
time to charge or discharge via the 100amp shunt on the negative
side of the battery. If you do not want to read the figures,
there is a battery indicator gauge on the right hand side of the
screen. The information the monitor provides leads to more
efficient use of the battery resulting in a longer battery life.
The BM1 uses 1.5 mA which
is about 1 amp hour a month.
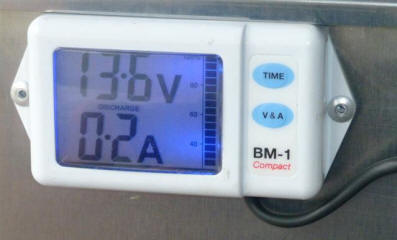 |
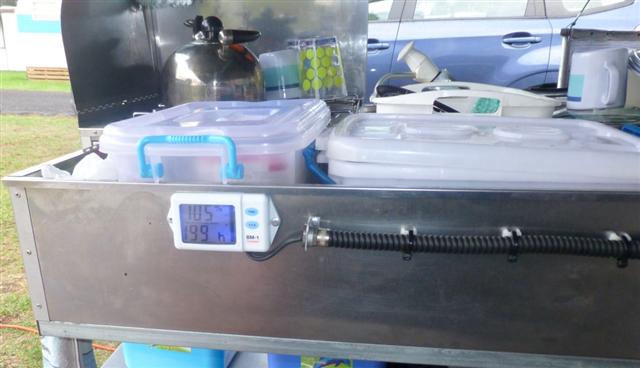
Showing the
battery voltage, the discharge in amps & graph up the
right hand side of the battery state of charge. |
| Showing the battery state of charge percentage & hours
remaining. |
 |
For more information
please check the NASA Marine website
http://www.nasamarine.com/proddetail.php?prod=BM1Compact
thanks to Peter Higgs for this article