I have been upgrading
the 12volt charging system in our VistaRV Crossover. I tend to
get paranoid about how much power I actually have in the
batteries and since I installed the
Victron Smart Battery Meter I now know exactly what there is
in them (State of Charge or SOC) and how many Amps are going in
or out.
The next thing to do was
to see if I could optimise the energy going in. I have an 80Watt
solar panel permanently attached to the Crossover and a 120Watt
folding solar panel which I use to chase the sun. There is also
an Anderson connection via 6B&S cabling to the tug. The
Crossover came with a 10Amp Projecta solar controller and a
Projecta 10Amp 240Volt charger. So how to optimise these energy
sources?
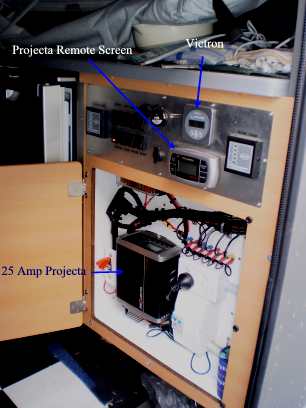
I replaced the 10Amp
Projecta 240Volt charger with a Projecta 25Amp one. I felt the
10Amp charger was adequate for one battery, but too slow
charging the 2x 100Ah batteries I had in the Crossover. The new
one is much faster, plus it has a remote LCD display with
controls. Because the main unit is inside a cupboard, I mounted
the remote on the electronics panel just inside the door of the
camper so I could see what was happening and change things if I
want to. I went with the Projecta because it allows me to
manually select the battery type and to play with the settings
if I need/want to, unlike many other brands. The remote unit was
also attractive as it lets me know what is going on and what
phase the charging is in without having to open the cupboard.
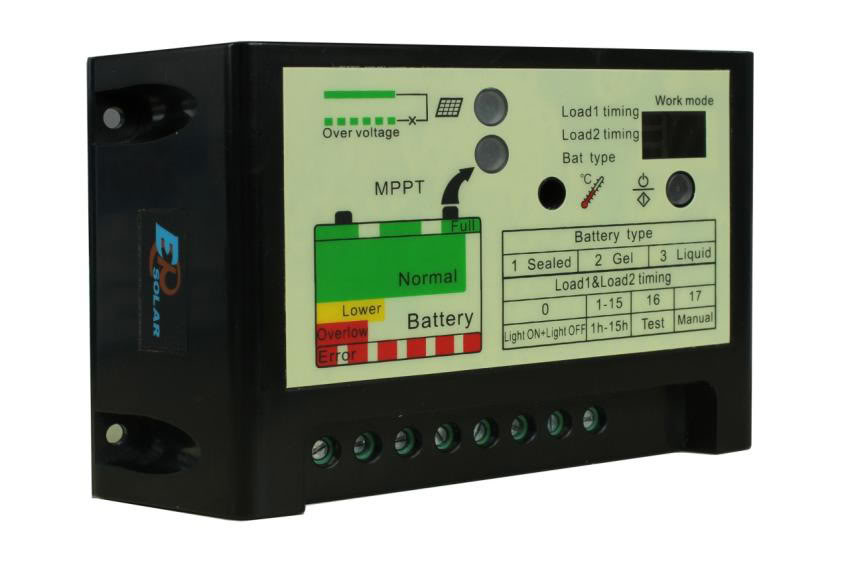
Next I had to work out
how to run the solar panels. After a lot of confusing research I
bought an MPPT solar controller to look after the 120Watt
folder. The controller it came with, as usual, was a cheapie
attached to the solar panel… The one I bought is a Tracer 10Amp
MPPT controller with a remote LCD screen so I could see what was
going on. A few different people had recommended this unit. I
mounted the controller right next to the batteries in the
Crossover, thus minimising the voltage drop. The remote readout
has a two metre cable attached so I can run this out to where I
can keep an eye on it. I have attached a couple of magnets to
the back of the remote so I can easily place it on the metal
external panels of the Crossover where I can see it.
I removed the cheap, too
light cabling the panel came with and replaced it with a 10
metre 6B&S one with Anderson plugs on both ends and attached an
Anderson plug to the solar panel outputs and the controller’s
inputs. That has minimised the voltage drop in the cabling. I
also bought a 10 metre stainless steel cable so I can lock the
solar panel to the camper when I am not around.
Next I decided to
install a DC to DC charger in the Crossover to try to overcome
the inevitable voltage drop caused by the roughly 10 metres of
cable between the alternator in the front of the tug and the
batteries in the rear of the Crossover. After my usual research
process I decided upon a Ctek D250S Dual as this has an MPPT
solar controller built in and so can look after the built in
80Watt solar panel as well. I removed the Projecta 10Amp solar
controller which came as standard and wired the solar panel to
the Ctek D250S Dual. I mounted the charger right next to the
batteries, once again to reduce any voltage drop to the absolute
minimum.
The D250S Dual is a
multi-stage 20Amp battery charger. The 20Amp limitation loomed
as the choke point in the system when charging from the tug.
Hopefully the Anderson cable will be capable of delivering more
than 20Amps when the batteries are at a low State of Charge,
under 80%. How to solve this problem…
I had read about the
Ctek SmartPass, but I could not get any really useful
information as to exactly what it does. Most information sources
simply say it is a really good thing, but give no pertinent
details as to why! Finally I found someone at Baintech, the
importers, who could give me the information I needed. There
were also a few others there who, it seems, could not! I
received by email, a PowerPoint file which explained what the
SmartPass actually could do. After viewing the PowerPoint, I
decided to order one.
The SmartPass is
connected directly to the D250S Dual via two supplied copper bus
bars, one to the alternator input and one to the charging
output. The charging output to the batteries is then connected
directly to the SmartPass as is the alternator input. The
SmartPass is a very useful bit of equipment, it seems. So, what
can it do? Here are some of its tricks:
1. If the batteries can
accept more than the 20Amps of charging current available from
the D250S Dual, the SmartPass will allow up to an extra 80Amps
of current to flow to the batteries directly though the
SmartPass itself. This means up to 100Amps can go into your
battery bank, if that much is available and can be accepted.
2. You can connect the
non-critical outputs from the batteries (up to 10Amps load)
directly to a terminal on the SmartPass instead of to the camper
batteries. The SmartPass will supply those loads directly from
the alternator when there is current available from that source,
and then revert to the batteries when it is not, i.e. if you
disconnect the Anderson plug or turn off the motor. You can use
up to a total of 110Amps from the alternator to charge the
batteries and run the non-critical loads.
This means, for example,
when the batteries are being charged by the SmartPass or the
D250S Dual, the fridge load of around 4.5Amps (and any other
load, up to a total of 10Amps) can be supplied by the
alternator, not the charging circuits, so the full 20Amps from
the D250S Dual can go to the batteries instead of roughly a
quarter of the D250S Dual’s output being drained by the fridge
when it is running. The batteries will charge faster because
they get the full 20Amps all the time. Very smart! Also, the
SmartPass will cut power to the non-critical loads if the SOC of
the batteries gets too low (11.6Volts), thus saving the
batteries from undue stress.
3. Both the D250S Dual
and the SmartPass have thermal sensors which allow the units to
reduce the charging rate if the batteries become too hot, thus
stopping overcharging.
4. The SmartPass can
also pulse charge your starter battery in the tug if the
Anderson plug is connected and the camper batteries are fully
charged and current is available from either a solar panel or an
AC charger. Cute!
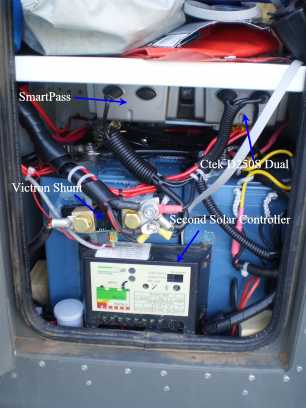
My next job will be to sort out and tidy up the battery
compartment. I need to move the shunt to the side, out of the
way. I could have used a Redarc BMS1215 which is a combination
of AC, DC-DC and solar charger all in one. I decided not to as,
if it should fail, you can’t charge your batteries at all as all
your chargers are in one basket, so to speak. It is also very
expensive at $1600 RRP. With my system I have three physically
separate charging devices. Should one fail, I have still got two
left and I only need to replace a $300 or $400 device, not a
$1600 one.
I then decided to
install a D250S Dual in the back of the tug to look after the
100Ah Gel auxiliary battery there. As the two D250S Duals also
work as battery isolators, I then removed the battery isolator
under the bonnet. I can now plug the folding solar panel into
the D250S Dual if I need too as well. Hmm, maybe I should
install a SmartPass in the back of the tug, too, then…
Will someone please tell
me to stop!
thanks to David Jones for this article