|
Water System for our Trak Shak
Camper Trailer
by Ken Uber
I was looking for a better system of water delivery to
the kitchen unit to make life easier for us rather than running round to the
jerry cans and tipping a jerry can to fill something. Also looking for something
to make it easier for our boys to assist with food prep, or just getting some
water without tipping a jerry can over and losing the lot.
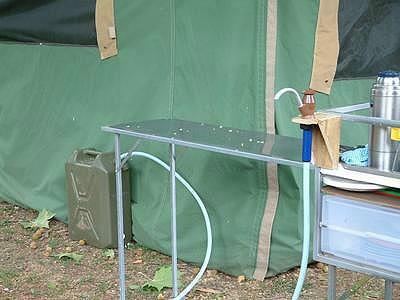
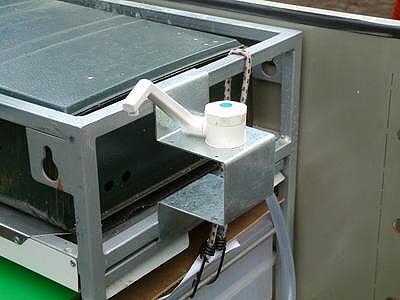
 My first attempt was crude, but it worked. I still had to move the hose
everywhere and it was prone to fall off if “worked” too hard. It was basically a
wooden holder with one of those short hand pumps connected through the eye of
the kitchen unit using a bolt and nut with “ears” so that the bolt would go
through one of the slotted holes. This worked ok, but the hose arrangement when
cooking inside was a bit unruly and when outside as in this photo was
cumbersome.
My first attempt was crude, but it worked. I still had to move the hose
everywhere and it was prone to fall off if “worked” too hard. It was basically a
wooden holder with one of those short hand pumps connected through the eye of
the kitchen unit using a bolt and nut with “ears” so that the bolt would go
through one of the slotted holes. This worked ok, but the hose arrangement when
cooking inside was a bit unruly and when outside as in this photo was
cumbersome.
My dream was to have a pump system that could provide
water anywhere around the camper without too much hassle and could even provide
shower facilities. After many months of day dreaming I went out and spent some
money and this is what I came up with.
Below I will describe in more detail the actual
fittings and construction, but in these photos you can see the pump housing near
the forward jerry can, some of the hosing including an outlet behind the wheel
arch and an inside shot showing the tap position.
I will start with the pump. I ended up with a Shurflo
pump from a caravan/camping place. Cost $130 & as well as that I picked up a
number of pipe fittings and some 13mm water hose.
The water pump
needed to be mounted to the camper with preference to the shaking and jarring it
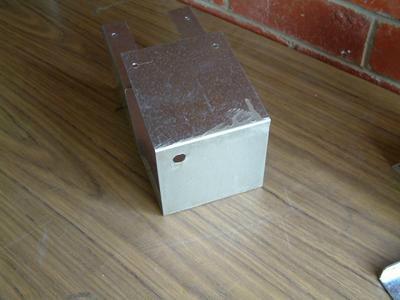
would encounter. To this end a “box” needed to be made up to secure it. I wanted
a box that had some built in redundancy such that if the rubber mounts that
held the pump in place let go the box would still hold the pump for latter
repair.

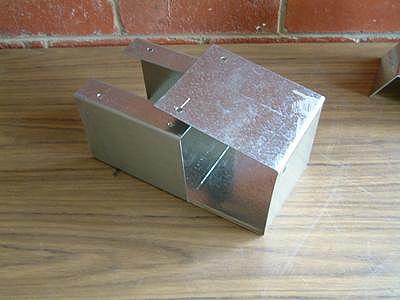
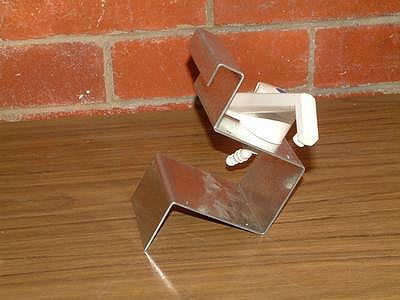
This is the box after getting being cut and bent at the
local sheetmetal shop and after I drilled the mounting holes. The holes on the
“flap” line up with the holes below. The pump is then to fit in with the water
lines going/coming out of the large voids either side.
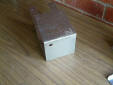
This shot also shows the hole I
made to suit the switch. Its in the wrong place, naturally, as the switch fouls
with the pump slightly when finally assembled. I would suggest closer to the
edge, and perhaps at the bottom, or even underside of the unit, as the switch
position may become an issue when trying to keep little fingers away from it.
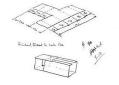
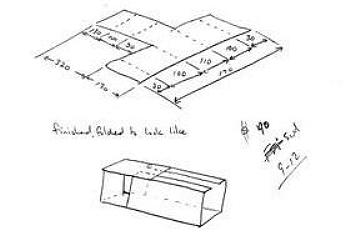
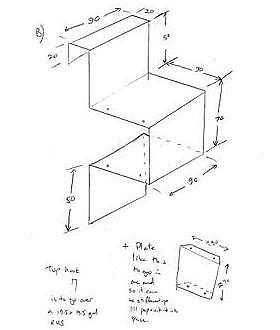
This is the cutting plan for the box that I gave to
the sheetmetal shop. It was made in something like 1.8mm thick gal sheet,
probably from scrap from another job. This plus the tap unit cost $40.

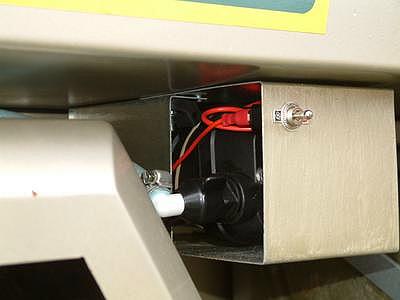
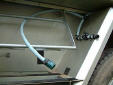
These photos show the installed pump, with filter on
the delivery side and on/off switch. The pump is secured to the roof, which has
been mounted by metal screws through the pole box. It was a fiddly job getting
it all there, trying to hold the weight of the pump while it was independent of
the box. The suction side of the arrangement, starting from the pump, has a
normal 90 deg elbow which slots into the pump, a bit of hose which is secured
using those plastic irrigation hose clips (for the extra $ it would be
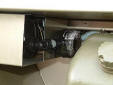 worth those screw type clamps). The $20 filter that is necessary if you want to make a
warranty claim against Shurflo. Then a 90 deg irrigation fitting elbow, clamped
as well, (all joints were clamped, to stop me repeating myself). worth those screw type clamps). The $20 filter that is necessary if you want to make a
warranty claim against Shurflo. Then a 90 deg irrigation fitting elbow, clamped
as well, (all joints were clamped, to stop me repeating myself).
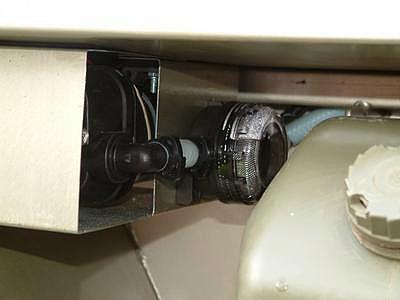
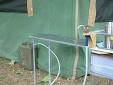
 These two shots on right show the hose going over to
the jerry can. At the jerry can another elbow and then a length of hose to reach
to the bottom of the jerry can. This hose fits neatly into the small opening of
those army plastic jerry cans. So much so that after a 3400km corner country
trip I reckon that NO water escaped (as evidenced by no dust/mud build up that I
got at the outlet where there was some leak). In the photo the jerry can is not
pushed home in the rack. When it is the elbow pops up under the
These two shots on right show the hose going over to
the jerry can. At the jerry can another elbow and then a length of hose to reach
to the bottom of the jerry can. This hose fits neatly into the small opening of
those army plastic jerry cans. So much so that after a 3400km corner country
trip I reckon that NO water escaped (as evidenced by no dust/mud build up that I
got at the outlet where there was some leak). In the photo the jerry can is not
pushed home in the rack. When it is the elbow pops up under the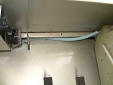 folded metal
very nicely. I had to take out the middle jerry at least when I needed to
change jerrys. folded metal
very nicely. I had to take out the middle jerry at least when I needed to
change jerrys.
The hose can be taken out of the jerry and either
extended or put into a bucket or whatever to provide alternative to drinking
water for something like a shower or sort of high pressure cleaning hose.
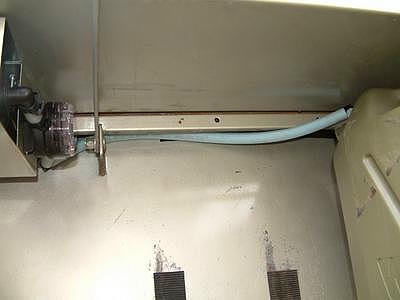
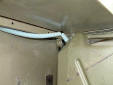
The hose comes from the outlet side and
over the wheel arch to a tee piece. None of it secured anywhere except at the
outlet on the wheel arch. From the tee piece to the kitchen, a short bit of hose
with a garden hose attachment connectors, one with the self stopping the flow
unless there is a fitting attached type connectors. The other end of the tee
goes to the “outside” tap. I have pop riveted some plastic clamps over the hose
to hold all this in position. This is also where I had the only leak. The hose
connects onto
a plastic irrigation valve, and on the supply side the fitting was not secure
enough. It leaked a very minor amount, far less than any loss from tipping a
jerry to fill a kettle. The valve is perhaps not good enough, I would have
preferred one of those metal ball valves, with positive stopping, but time was
of the essence. The actual outlet is a threaded hose connector. This is so I can
attach other hoses/showers etc off this. It only just juts out so that it
(hopefully) won’t get knocked off in tight manoeuvring. This outside tap is
great for roadside stops or that last minute hand clean after hooking up.
The tap arrangement in the kitchen had to be simple,
easy to use and not need any elaborate set up. The final design fits the bill
nicely. It can stay where it is, is able to be closed in with the kitchen
without fouling the trailer sides, and only needs to be clicked together at the
connection point. When travelling the faucet folds down, and the hose wraps
around the sink.
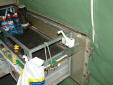
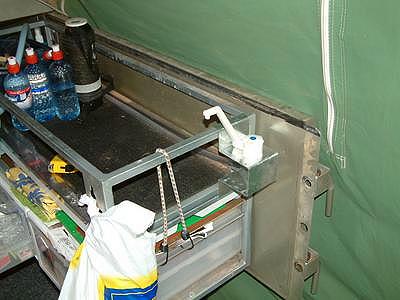
The tap frame has been made so that it just rests on
the kitchen frame and also allows the pullout bench to be pulled out. In this
photo the occy strap holds the bench in place especially for travelling. Note
that our kitchen was made to suit our Coleman dual fuel stove and the depth of
the stove bit might be different, something to check. I used clear 10mm hose
from the tap because the tap fitting is 10mm. There is a 10mm – 13mm joiner
behind the drink bottles. The hose then snakes down between the tailgate and the
trailer to pop out just where you need to connect it to the outlet pipe. Naturally with
little inquisitive hands there are a few
goes at checking the jet stream of water, we countered this with a bucket under
the tap or with the bench out, the hands don’t seem to be able to reach the tap,
but even still a cup under the tap is useful.
pop out just where you need to connect it to the outlet pipe. Naturally with
little inquisitive hands there are a few
goes at checking the jet stream of water, we countered this with a bucket under
the tap or with the bench out, the hands don’t seem to be able to reach the tap,
but even still a cup under the tap is useful.
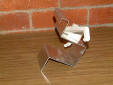 This is the tap unit. I had asked for 1.8mm thick gal
steel plate, but the guy made it with 2.0mm thick plate, I would suggest that it
is great like this. It’s a little bit heaver, needs no reinforcing and is solid
enough to stay put. I used a hole saw to drill out the hole for the tap, which I centred towards the outside to allow some movement of the faucet arm. The tap
unit is one from the caravan part shop and folds down. This is the tap unit. I had asked for 1.8mm thick gal
steel plate, but the guy made it with 2.0mm thick plate, I would suggest that it
is great like this. It’s a little bit heaver, needs no reinforcing and is solid
enough to stay put. I used a hole saw to drill out the hole for the tap, which I centred towards the outside to allow some movement of the faucet arm. The tap
unit is one from the caravan part shop and folds down.
This is the bending detail, you will note that I asked
for an additional bit that was to act as reinforcing, but as mentioned above I
didn’t use it.
Thanks to Ken for the use of this article.
|