|
installing
lithium batteries
the latest in battery technology
lithium batteries in place in battery
compartment
We recently upgraded from our four and a half
year old Vista RV Crossover to a new Crossover XL. As part of the
process I spent around three months investigating battery options.
The original Gel batteries had done a good job, but I thought I
should check out some of the newer options. I looked at Lead Crystal
batteries and Lithium cells. My final decision was to opt for
Lithium cells.
theory
Lithium cells are around half the weight of lead
batteries, yet can be safely discharged to 20% State of Charge
(SOC), as opposed to only 50% SOC for lead batteries. This means
Lithium batteries can give 160 useable Amp hours out of 200 Amp
hours total instead of 100 Amp hours from the same 200 Amp hours of
lead batteries, a 60% gain.
They also maintain their voltage down to 20% SOC
so things like fridges keep working efficiently. The voltage of a
lead battery drops off as the battery drains. Lithium cells can also
safely accept up to 1C (one times the rated Amp hours of the cell)
so, in this case, 1x100 = 100 Amps as a charging rate and can handle
high discharge rates as well, easily 100 Amps.
They are also very efficient at charging, almost
100%. The down side is the initial cost of roughly twice the same
nominal capacity Gel of AGM batteries. This however is offset by
their long life, usually 10 to 20 years.
There is much spirited – if not downright
vitriolic! – debate online as to how to go about setting up Lithium
cells. In the end, after talking to several suppliers, I opted to
get the cells and monitoring equipment from EV Works in Perth and
follow their advice. I put together a reasonably simple setup which
monitors individual cell voltages and automatically attempts to
rectify any problems.
putting it all
together
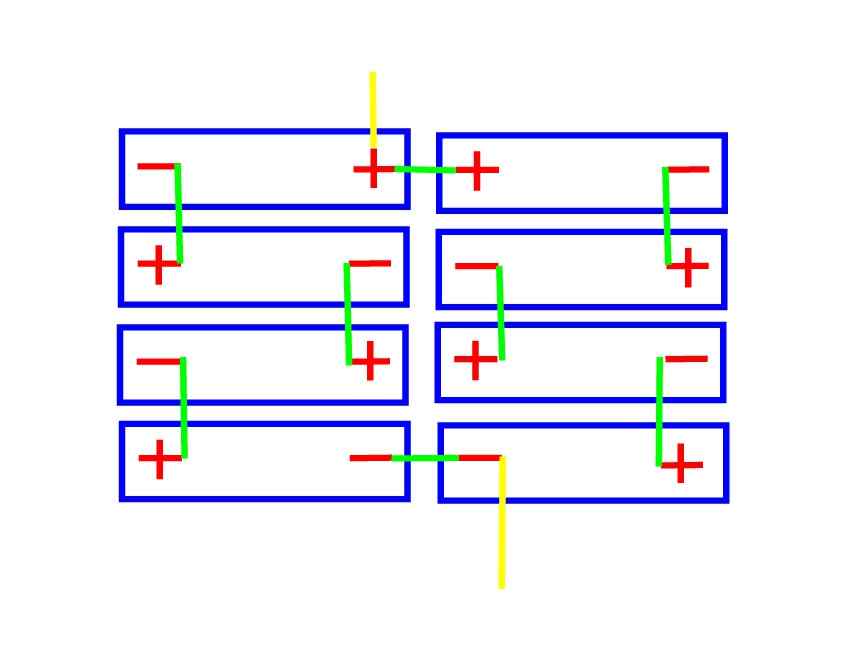
Lithium cells come as individual 3.7 Volt cells
with different Amp hour ratings. You can make up a “battery” out of
however many cells of the same Amp hour rating as you need to get
the voltage you need. To get a 12 Volt battery, you need four cells.
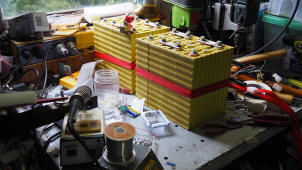
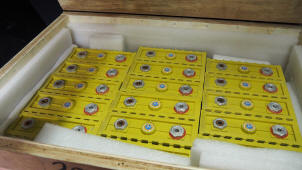
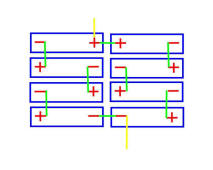
I decided to go with eight Winston 100 Amp hour cells, arranged as
two 100 Amp hour, 12 Volt batteries. I joined two sets of four cells
together in series in mirror image. The end positive and negative
terminals are then side by side and can be easily joined together in
parallel, giving 200 Amp hours at a nominal 12 Volts.
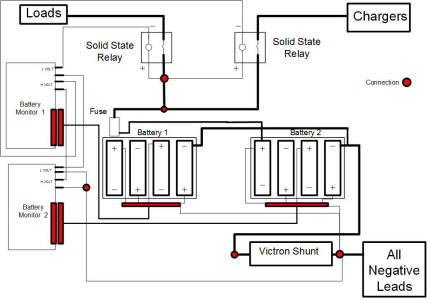
To monitor the individual cell voltages, I used a
pair of ZEVA BMM8 Battery Monitor Modules from EV Works. You need
one module per battery. These modules use a wire attached to each
positive terminal of a battery to monitor the voltages. You also
connect a negative wire to the module. The module can then monitor
each cell in a battery individually and detect if one cell is going
too high or too low in voltage. If this happens, a small solid state
relay on the circuit board is triggered, causing it to open. There
is one for high voltage, another for low.
These relay outputs are, in turn, daisy chained,
high with high and low with low, over the two batteries. The cables
are then run to a pair of solid state relays, one connected to the
charger outputs and the other to the loads – fridge, lights, etc.
These relays will disconnect either the chargers or the load on the
batteries, depending upon the problem. If a cell is too high, the
chargers are disconnected, leaving the load still connected to draw
the voltage back down. If a cell is too low, the load is
disconnected, leaving the chargers connected to try to bring it back
up. Once the problem is fixed, the relay is reconnected
automatically.
I fitted a pair of 100 Amp solid state relays
from Jaycar. These were cost effective and have a very low current
demand. I made up a pair of wiring looms with four wires each, each
wire terminated with an 8mm eye terminal. The wires were from a Cat5
network cable with braided strands. The eye terminals were attached
to the positive posts of each cell, one loom per battery. The other
ends of the wires were soldered into the male plugs to connect to
the BMM8s.
I made a second set of positive terminal wires
running from both batteries into the electrical cabinet of the Vista
Crossover XL. These connect to a pair of plugs, one per battery,
which I can attach to a pair of Cell Log8s which give a readout of
each individual cell voltage when connected. This I did for peace of
mind – and because I am a technoweenie and I could! The Cell Log8s
came from Hobby King who have an Australian outlet.
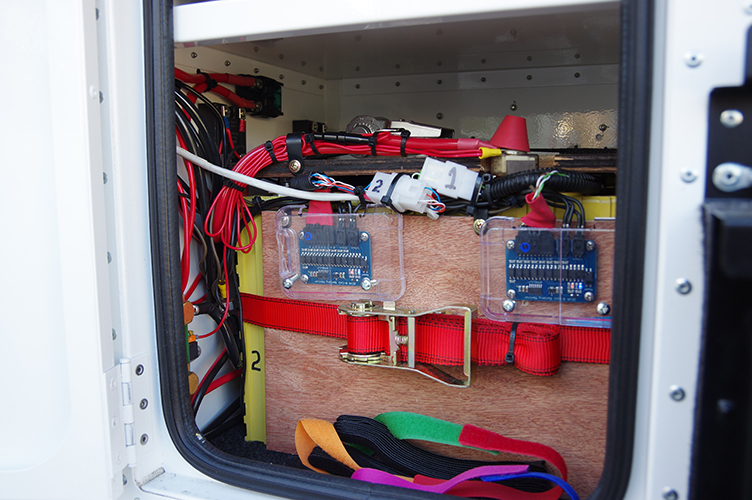
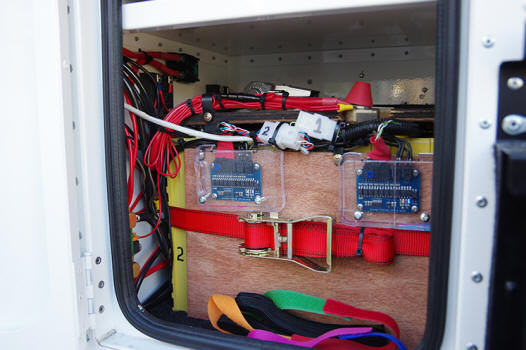
A section of 12mm ply was fitted to the top of
the batteries to protect the terminals and to the front of the
batteries to allow attachment of the BMM8s. The batteries were
fitted into the battery compartment on the Vista Crossover XL and
secured in place with a ratchet strap running around the cells to
hold them together and another strap over the top to hold them down.
The BMM8s were screwed to the ply and then a clear cover was screwed
in place to protect them. I used a couple of clear plastic lids from
NARVA component boxes, but a piece of clear perspex would do.
Two positive cables were attached to the
battery’s common positive terminal, one running to the charger solid
state relay, one to the load one. One negative cable was attached
and it runs to the shunt for my Victron BM700 intelligent battery
monitor.
at first
The cables were then all attached and the system
commissioned. I discovered that the charge relay disconnected upon
commissioning. After checking I found out that Lithium cells, like
lead batteries, can hold a high residual charge – a “surface charge”
– when they are charged initially. I simply turned on a few LED
lights in the Vista Crossover XL for a while and the relay turned on
as the surface charge was taken off the cells. It worked as
advertised.
One of my biggest worries was finding appropriate
chargers. I spent a lot of time examining the specifications of some
very expensive chargers, several of which claimed to be ideal for
Lithium batteries. Upon much research I worked out that most of them
were not. After talking to people who install Lithium batteries for
a living, I worked out that charging is not such a problem after
all.
charging
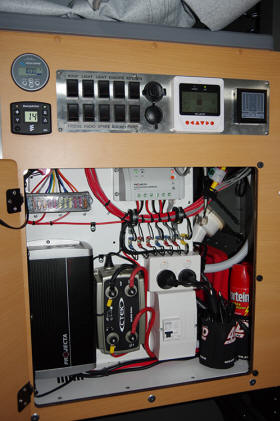
Charging in the Vista Crossover XL is done by
three separate chargers. I have a Projecta 50 Amp AC-DC charger to
handle charging from 240 Volts when it is available. This charger is
rated to 0.5C of the 100 Ah cells, so is very safe for a fast charge
– under four hours if the batteries were down to 20% SOC. I have it
as “Power Supply” so it delivers 13.8 Volts to the batteries. This
is considered a very safe charging voltage.
There is a Ctek D250S Dual to work as a DC-DC
charger when driving and as an MPPT solar controller for my two 135
Watt semi flexible portable panels. This charger is not user
configurable at all. It supplies 14.4 Volts as a bulk charge and
13.8 Volts as a float.
The third charger is a Projecta 20 Amp solar
controller to look after the 105 Watt fixed solar panel on the rear
of the XL. This panel can easily be removed to allow me to put it
out in direct sun. The charger is set to “Gel” so it supplies 14.2
Volts on bulk charge and 13.8 Volts as a float.
overview
The system is working well with all the cells
staying within 0.01 of a Volt of each other – a very good thing.
Losing 35 kilos and gaining 60 Amp hours is a wonderful thing!
The total cost, including monitoring hardware,
was around $1700 for 200 Amp hours, 160 Amp hours useable, with a
weight of around 30 kilograms. To get 160 useable Amp hours out of
lead batteries you would need roughly 300 Amp hours of capacity,
costing around $900 for good quality batteries and weighing around
100 kilograms.
links
EV Works
http://www.evworks.com.au
BMM8 module
http://www.evworks.com.au/zeva-8-cell-bat-monitor
Jaycar Solid State Relay
http://www.jaycar.com.au/Electromechanical-Components/Relays-%26-Accessories/Solid-State/Solid-State-Relay-4-32VDC-Input%2C-30VDC-100A-Switching/p/SY4086
Cell Log8
http://www.hobbyking.com/hobbyking/store/__44896__Cell_Log_8M_Cell_Voltage_Monitor_2S_8S_Lipo_AU_Warehouse_.html
|
 |
 |
|
two batteries made
up on the work bench |
individual cells in
a crate |
|
 |
 |
|
battery compartment |
 |
|
how cells are
connected to make two batteries |
the three chargers
in the electrics cupboard |
|
 |
|
circuit diagram |
Thanks to David Jones for this article
july
2015
|