|
Webasto
Airtop 2000st
installing into a camper trailer

introduction
Being born in a sub-tropical
island, anything below 25 degrees is on the fresh side and anything
below 20 is on the freezing side for me. So the extension of bush
camping, the form we prefer, beyond the summer months had to involve
some form of heating. I have tried several systems ranging from the
Zodi gas heaters (a gas heat exchange system no longer manufactured
and in any case not approved in Australia as far as I know) to the
Coleman catalytic gas heater. These were OK additions but nowhere
near the necessary heating level I wanted nor the safety I would be
comfortable with for leaving it running all night. I wanted to be
sure that the combustion part was completely separated from the
heated air sent to the living area. This is why I finally decided on
making the expense of a cabin diesel heater and we have been
delighted with the result.
Having a diesel powered car and
only two 4.5Kg gas bottle holders on the camper trailer, plus the
lower cost of fuel per unit of heat, the choice was easy for me
between diesel and gas, but this is really a case by case decision.
The key is to enjoy the outdoors in the colder months. Since I enjoy
the DIY side of things too, I could install the diesel heater myself
without requiring the services of a third party for the gas
connection. The unit was more than powerful enough for heating up
the sleeping section of our 12" tent in humid +3 degrees nights we
had near Tassie's highland lakes in late April.
I bought a Webasto Airtop 2000ST
unit from a distributor in Sydney about a year ago (transacted over
this famous auction site for around $1300) and I have to say this
has been the best investment made as an addition to our camper
trailer. The Webasto kit is very comprehensive but is a general kit
meaning it is suitable for RVs, cars, trucks and boats and therefore
you will have a few spare parts left at the end. On the other hand
there are a few extra items necessary for the campertrailer mounting
but this is all available from local stores. I have made a list of
these items at the end of this how-to.
I suspect an
EBERSPACHER unit would mount the same as they look strangely
similar.
The operation of the unit is
pretty simple since there is a thermostat (supplied) that controls
the temperature and determines the starting and stopping of the
burning in the unit, and in between, the regulation of the heating
rate. I describe below how the unit works in the context of a camper
trailer as this was not obvious to me until I run it. The benefits
are of course keeping the sleeping area and the annex warm but also
drying the canvas when dew or rain makes it damp or wet. Alternative
uses include: cloth dryer and hair dryer (imagine a 2000 watts hair
dryer for your better half), and many more uses I am sure.
key
considerations before buying/installing
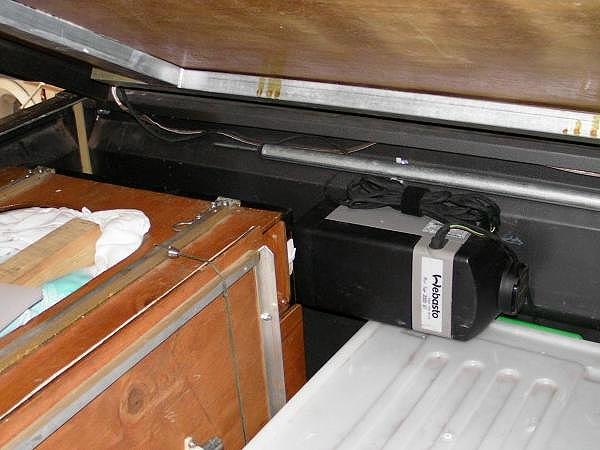
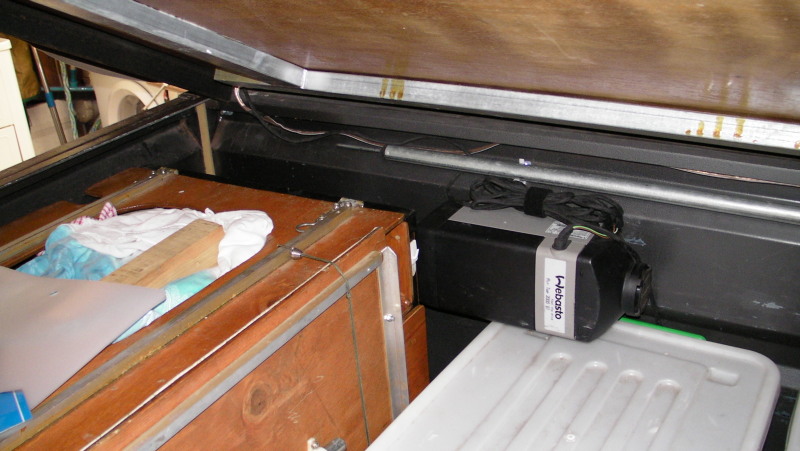
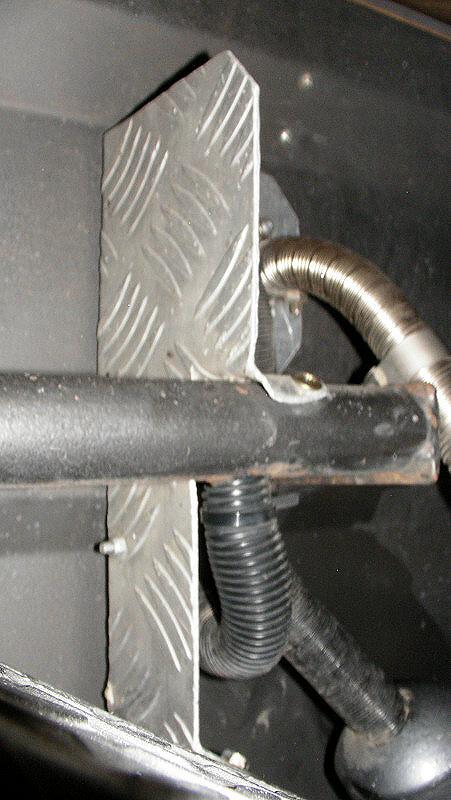
1. Where to mount the unit. The key consideration here was where
will the heated air be directed to. In my case I found that under
the bed, on the articulated side, and just in front of the kitchen
was the most practical for sending the hot air either to the annex
(nice for a comfy breakfast in the morning), or to the bedroom by
just moving the short flexihose. Also consider other items in the
trailer for physical interference, in my case the swing-out kitchen.
Noise from the unit itself is also to be considered, with a simple
barrier (e.g. the wooden bed base) being sufficient.
|
|
 |
|
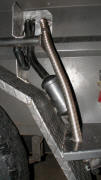
heater mounted under bed, in front of tailgate kitchen |
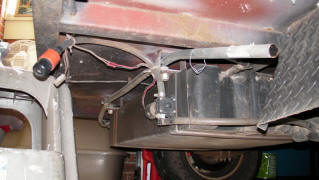
external
side of heater with protection |
2. The path from the fuel tank to
the heater and what type of tank (Jerry can or permanently dedicated
tank).
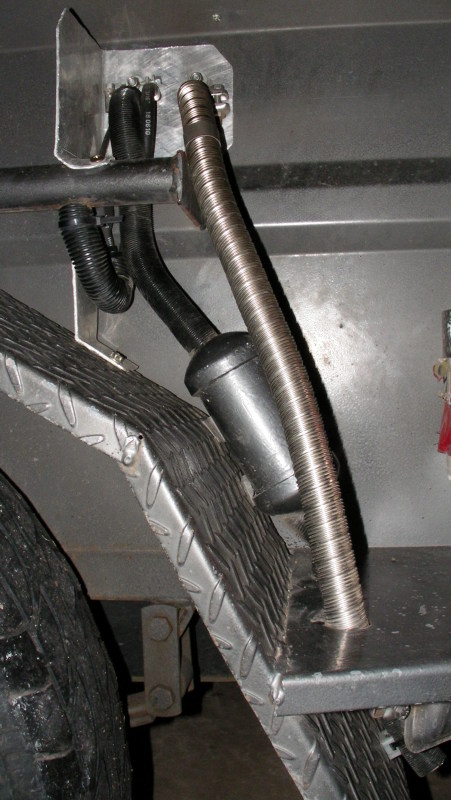
3. The path of the combustion air
inlet and exhaust, the placement of the fuel pump and their
protection from external elements (rocks, dust, water).

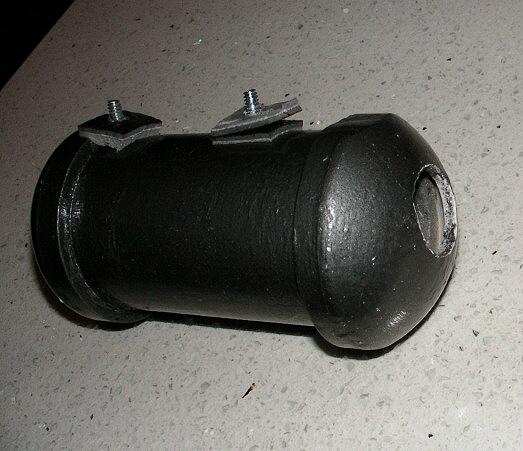
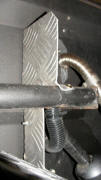
|
|
exhaust
muffler and combustion inlet |
4. The 12V electrical source. The maximum current consumption is
around 2A once started, therefore a 10 hours overnight run will use
20AH at full power. In my experience expect between half and 2/3rds
of this since the heater adjusts the power down when the temperature
reached the desired value. The maximum current at start and stop of
a combustion cycle is 7A for approximately 2 or 3 minutes. And this
should happen only once or no more than a few times per night. So
most batteries found in CTs will be more than capable enough if
charged properly the day before.
Care must be given to the 12volt
power supply circuit: it is best if the heater’s supply wires are
connected directly to the battery as the unit checks that the
battery voltage is not too low to prevent damage by
over-discharging. If not connected directly, the additional supply
cables need to be of sufficient section to minimize the voltage drop
especially during start-up (7Amps draw).
5. Re-circulating or fresh air
input. Fresh air input means that the clean air which passes through
the unit and is then sent to the living areas is not taken from
these areas but from the outside. The benefit is a simpler
installation (only one flexihose to worry about) at the slight cost
of extra fuel consumption since the outside air is colder than the
one in the heated area. Using fresh air also means that a separate
temperature sensor is required since the unit normally measures the
room temperature in the return circuit. I describe below how to add
this sensor without breaking the bank.
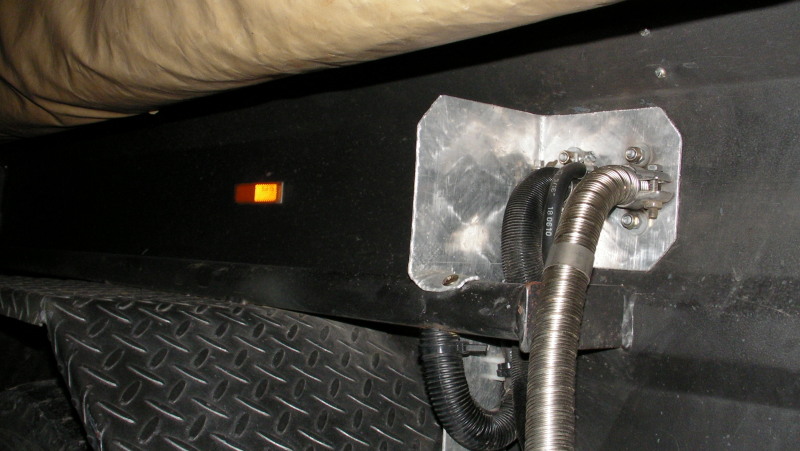
|
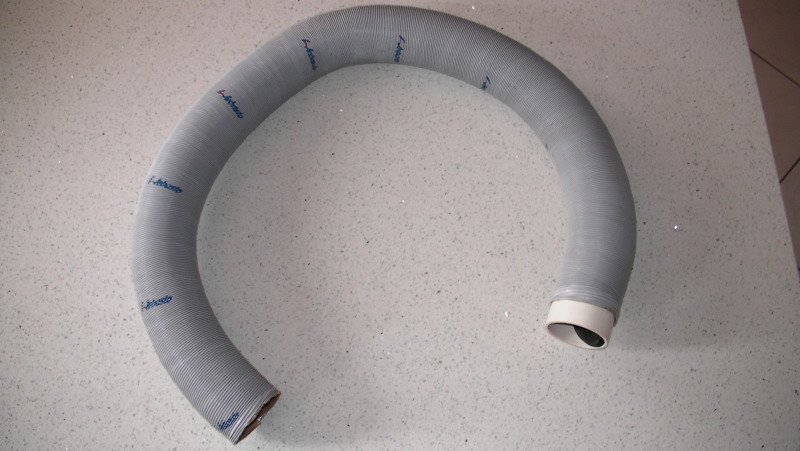
|
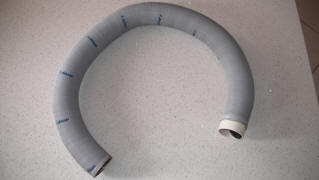
hot air, meter long flexihose, connects to clear air
exhaust, shown with additional sound damper |
Noise is an aspect that needs attention since the primary
application of such devices is on motor vehicles in cold countries
or in RVs with a solid shell. The canvas does not provide much of a
sound barrier and after the initial tests in the field I made a few
modifications and enhancements to alleviate this issue. We now have
a very silent heater, making less noise than an electric fan heater
when we are in bed and not producing annoying noises for the
neighbours.
The noise sources are:
a) The burner's noise (like a 747's reactor - in reduced version of
course)
b) The noise of the burner's inlet fan
c) The hot air fan (the one that pushes the air in the CT).
d) The fuel pump. This is a piston dosing pump meaning that is
produces a “tock” noise every second or two depending on the heating
rate. The mount supplied is ok for an RV but not for a canvas CT in
my opinion.
e) The noises inside the unit itself (fans mainly and combustion).
the installation
I have installed the unit in the
trailer below the articulated side of the bed and towards the back
(just in front of my tailgate kitchen). See pictures above. That way
I can direct the air either in the bedroom or in the annex just by
moving the flexihose around. As I have small zippers in the corners
where the PVC floor joints the bed, I simply pass the flexihose
though one of those for when we sleep.
Mounting the unit under the bed
means that its noise proper is pretty much eliminated, and the
following was done to reduce the noise sources mentioned above:
1. I installed the supplied
burner's exhaust silencer and added the maximum length of pipe to
eject the fumes to the opposite side of the CT (on the opening side
of the bed base). The exhaust pipe passes under the trailer behind
the water tank and is simply made of the outside pipe of long
galvanized tent pole, cut at the extremities. This joins perfectly
with the stainless steel exhaust hose supplied. The length and the
direction of the exhaust mean we barely hear the "747".
|
|
extended
exhaust pipe towards outside of trailer |
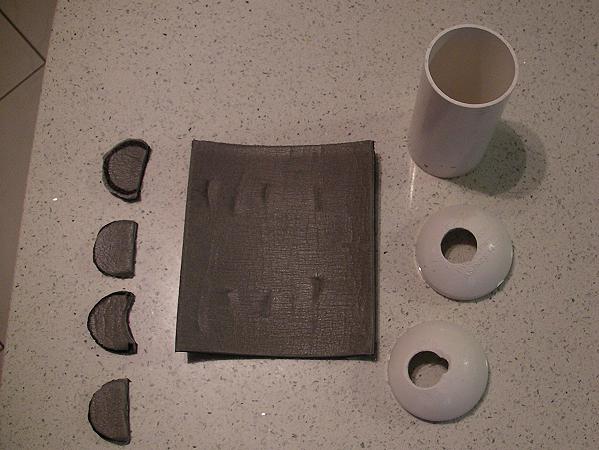
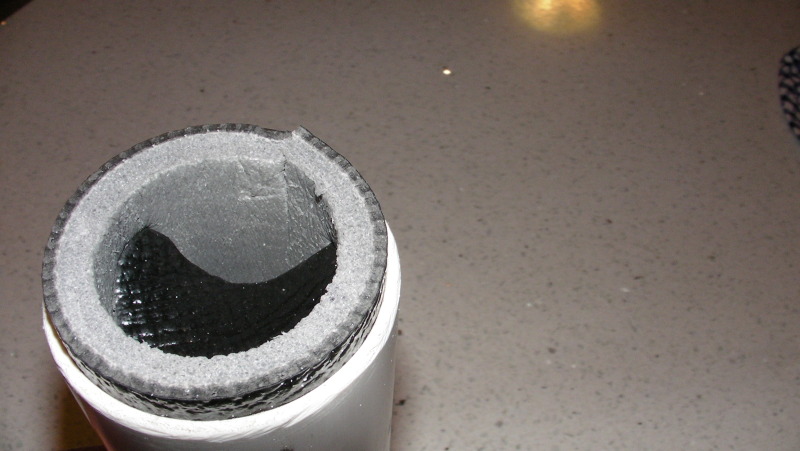
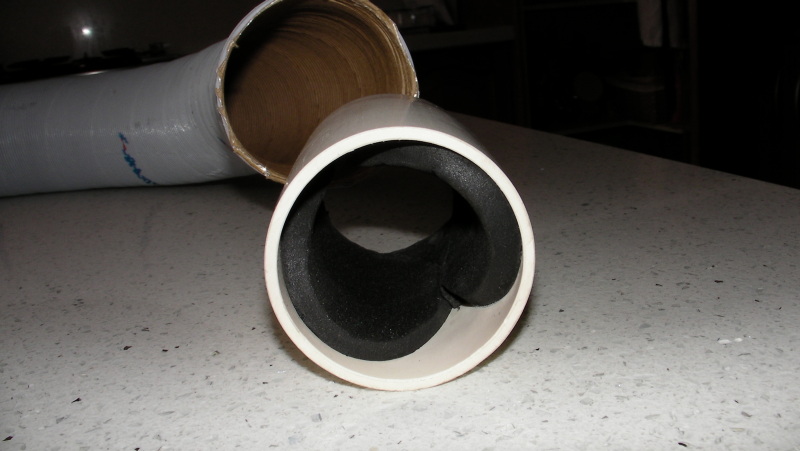
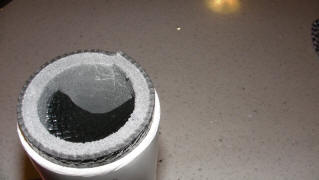
2. I have fabricated and added in the combustion inlet a silencer
made of PVC pipe and foam (like a muffler). This silencer is only
about 25CM long but does reduce the inlet noise quite significantly.
See the pictures below which describe the parts required. The end
caps are PVC water pipe caps (from your preferred hardware store)
and glued using water pipe glue (acetone based I think). The
internal wall of the pipe section is laid with a piece of sound
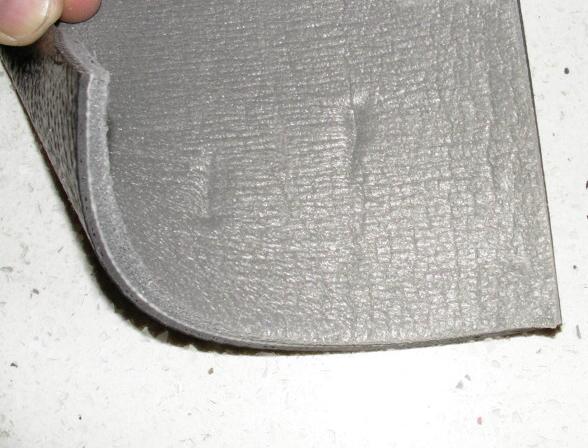
deadener sheet from Jaycar (part no. AX3689) and the labyrinth made
of pieces of the same sheet. They are glued using contact glue.
|

|
 |
 |
|
inlet
damper, complete |
inlet damper, all components |
noise
dampening sheet (Jaycar) |
|
|
 |
|
inlet
damper lining |
inlet damper with inlet pipe |
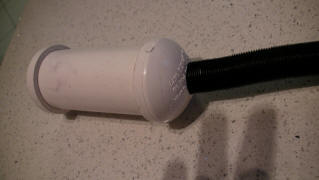
The entry and exit of the inlet
pipe (the little back flexible hose) in and out of the muffler are
sealed with silicone to ensure good sound proofing. There are
commercial variants of these mufflers for the Webasto units.
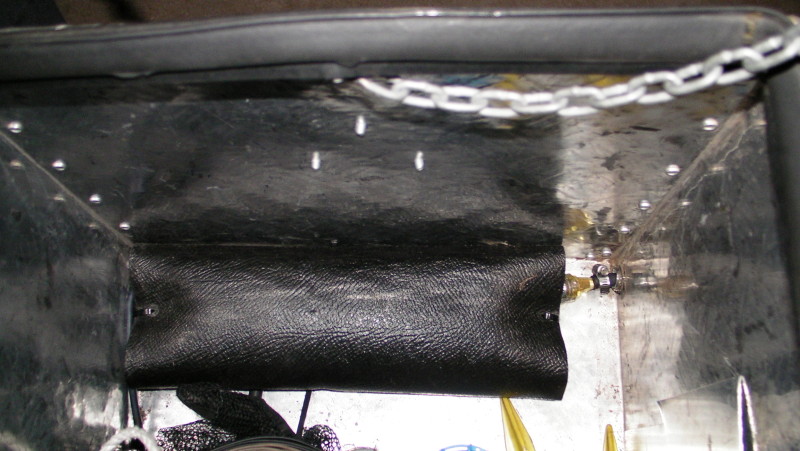
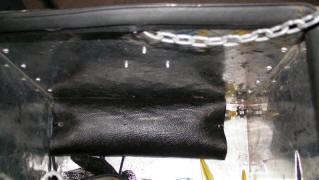
3. I have made out of a 7cm
length of 50mm PVC pipe and some high temperature foam a
silencer/reducer for the hot air outlet (the one in the CT) that I
can insert or remove as needed. If I want full output for a quick
heat-up or for drying the tent I leave it out, and I insert it
before going to bed. This reduces the fan noise but also slows the
flow of heated air and forces the unit to reduce it's burning rate
further which in turns reduces the noise even further.

|
|
inside
of hot air outlet sound damper |
4. I placed the fuel pump inside
the front tool box to separate it from the rest of the trailer since
it vibrations can be transferred to the trailer box itself and
resonate though. I made it completely silent by wrapping it into a
complete sound deadener sheet from Jaycar (part no. AX3689) and
added a small fuel filter for good measure.
Note that the normal mounting of
the fuel pump is on the outside of the trailer as are the combustion
inlet and exhaust pipes.
|
|
fuel
pump soundproofing and micro-filter(RHS) |
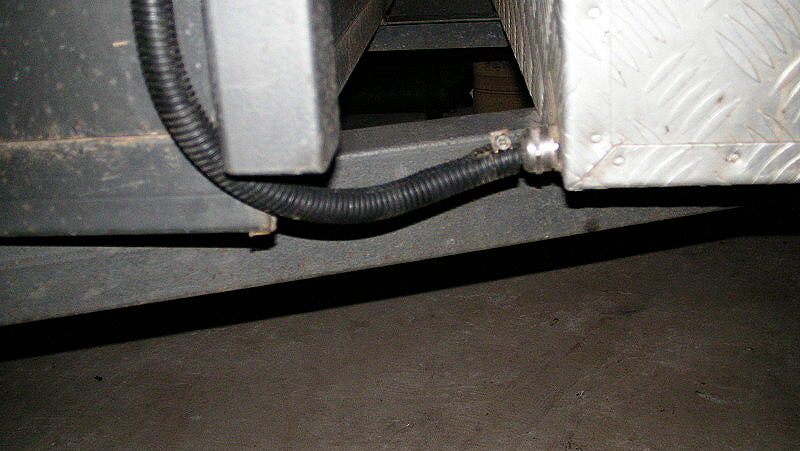
To protect the fuel lines when passing outside the trailer’s body I
inserted the supplied hard plastic pipe (around 4mm diameter) into a
6mm windscreen wiper’s water pipe and then into a split-tube loom
tube (both from your preferred automotive accessory shop). If
required, a fuel pipe from the same shops will provide extra
protection for the fuel line as they are reinforced. I used glands
for the entry and exit to/from the tool box to keep it water and
dust proof.
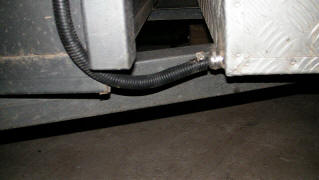
|
|
protection
offuel line and gland for sealing the toolbox |
I had to fabricate a protective
plate for the inlet and outlet pipes as they are on the outside of
the trailer and could be damaged by flying rocks. This was done with
a piece of 1.5mm aluminum checker plate from a hardware store. It is
used as a backup plate for the heater, therefore I did not use the
supplied backup plate.
|
|
 |
|
front
side of protection plate |
protection
plate as backup plate |
I paid attention to the space
around the combustion hose as it gets very hot and is necessarily on
the outside of the trailer. Children could get burned and the PVC
floor of the soft floor camper could get damaged if there was
contact. In my case, the combustion inlet and exhaust are hidden
behind the PVC where it joins the bed base, with about 15 cm
clearance between the hot pipe and the PVC.
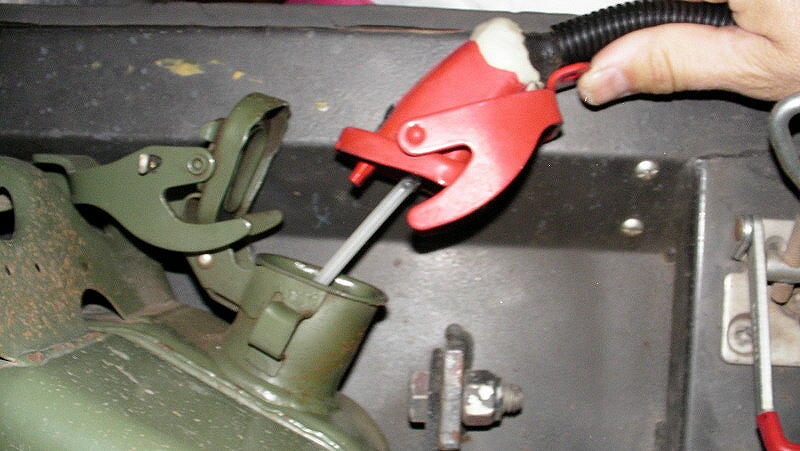
I also found out that the fuel
pump is very powerful and will bend the tank in (even a metal jerry
can) if no breathing of air is allowed in. I made a fuel pickup cap
from a jerry can nozzle and used two part epoxy tank repair compound
to fill the end (see Picture), then sealed with black silicone.

|
|
jerry
can cap with fuel line |
One note: the first time the heater is started it will take some
time for the fuel line to be purged of air and this will require
several start and stop sequences (about 6 or 8 from memory in my
case), so be patient. If there is a bit of air left in the fuel
filter placed before the pump, it does not seem to alter the working
of the unit.
how it
works
The heater works the following
way from what I have observed: When the thermostat is turned from
the OFF position to a certain temperature the unit will start it’s
fan at very low speed (almost inaudible). If the air
temperature is or drops below the set temperature it will initiate a
heating cycle.
This means that it will purge
it’s combustion chamber first for a minute or so and then start it’s
hot surface (like a glow plug) and start the pump to inject diesel
in the chamber. During these 2 or 3 minutes the 12V current
consumption is around 7 Amps. Once the combustion is started (the
747 like noise becomes noticeable), it will switch off the hot
surface and the current will drop to about 2 Amps. At this point it
produces about 2KW of heat and the air fans are at maximum speed.
Once the air temperature gets
close to the set temperature of the thermostat, it will reduce its
heating rate to maintain that temperature. The minimum it seems to
be able to run at is just under half of full heat (about 0.9KW). At
this point it has reduces it’s fan speed quite a lot and the noise
level has reduced significantly as well. The current consumption is
around 1.1 Amp at that seems to be the standard running for our unit
during the night.
If the temperature get above the
set point or the thermostat set point reduced enough, or the
thermostat turned to the OFF position, the unit will initiate a
burner shutdown by stopping the fuel pump then lighting up the hot
surface again (7Amps during that time) for about 2 or 3 minutes to
purge the combustion chamber of fuel. Then it will only run the fans
to cool down the unit for 3 to 5 minutes before going back to a very
low standby fan speed or shutting them down completely (thermostat
in the OFF position).
The fuel consumption is very
reasonable and my 20L jerry does lasts over a week with around 10
hours of runtime per day (we keep it ON all night).
I never had an issue with fumes
as the only time I can see diesel fumes is when the unit initiates
or terminates a heating cycle. Since these should be kept to a low
number (ideally once or at most a few times a night) this should not
be an issue. During normal running, there is only humid hot air but
no visible fumes coming out of the exhaust. Furthermore with the
exhaust being brought right back to the outside of the trailer with
the long exhaust pipe it should not normally smell at all in the
sleeping section.
conclusion
The whole installation was relatively strait forward with only the
noise reduction requiring extra work. If I had to re-do it again the
only change I would make would be to mount the fuel pump inside a
small box (aluminium toolbox for example) behind the jerry can,
instead of using the front tool box to house the pump. This would
have reduced the amount of fuel line routing I had to go through.
With winter coming, this is a
great project to extend the camping season.
No link to any of the
companies/brands, just a warm happy camper.
This is just meant as an example
of what can be done as I am no expert in the matter. Please seek
advice before installation.
list of
materials & costs
1 x Webastor Airtop 2000ST
(around $1,400 these days on “that auction site”, plus about $50
transport).
1 x 1.5 mm aluminium check plate if external protection of inlet,
outlet or pump is required – approx $25
1 x 1 metre of 50mm white PVC pipe, 2 x end caps, PVC glue, contact
glue, part of 1 x sound deadener sheet from Jaycar (part no. AX3689)
– say $40
1 x long galvanized tent pole for exhaust extension (if required) –
approx $17
1 x tiny fuel filter (have been known to be supplied in some kits) -
$9 from Autobarn
1 x sound deadener sheet from Jaycar (part no. AX3689) or the
leftover of the one above for the pump noise reduction. $29
1 x length (as required) of wiper’s water pipe (black from an
automotive accessories shop), 1 x length (as required) of split-tube
loom tube (from same shop or Jaycar) – approx $30
Cable glands as required for fuel line and fuel pump electric cable
if mounted in a water/dust proof box – approx $25
1 x tank or jerry can. Plastic is fine, making sure it can breathe
while the heater is running – approx $30
how to
make & wire an external temperature sensor
This is necessary if the heated
air is not re-circulated (i.e. fresh air is used), as the heater
normally measure the living air temperature by the return air
circuit. Two wires (one yellow, one black and blue) are visible near
the thermostat on the wire loom. They are connected to a fixed
resistance inside a small rubber cover.
Simply cut the wires and replace
the resistance with a 10KOhms NTC thermistor (Jaycar part number
RN3440 at $1.35). Insulate both wires of the thermistor and add a
layer of insulation around the thermistor to provide a bit of
protection and temperature sensing lag. This may void the warranty
so there is a Webasto external temperature sensor available too.
I have mounted the thermostat in
one corner of the wooden bed base and the thermistor is mounted at
bed level since this is the temperature we want to keep constant.
This is just meant as an example of what can be done as I am no
expert in the matter. Please seek advice before installation.
thanks to John Douyere
for sharing this idea
may2011
|